
Where healing comes from in the demo, from checkpoint rooms to the Crypt Key relic, and how to survive the sewers.
Castlevania How to Heal in Belmont's Curse
Healing in the Belmont's Curse demo comes from four places: an L1 mana heal you can trigger anywhere, the flasks you drink mid-fight, a full restore every time you touch a Mirror of Life checkpoint, and a food pickup hidden in a breakable wall on the road to the boss. Mana refills only when you kill enemies, so every heal is a small routing decision.
- L1 spends mana to heal on PS5, and kills are the only published way to refill that mana.
- Every Mirror of Life saves, fully heals you, refills your flasks, and sets your respawn point — but nearby enemies respawn too.
- A food pickup in a breakable wall near The Fallen fills health to maximum.
- The Crypt Key relic turns every chest into a full heal, but it comes from a preview build and is unconfirmed in the demo.
Every healing source at a glance
| Source | What it restores | Cost or condition | In the demo? |
|---|---|---|---|
| L1 heal | Health | Mana | Yes, PS5 input confirmed |
| Flasks | Health per drink | Limited charges, refilled at Mirrors | Yes |
| Mirror of Life | Full health, flask refill, save | Reach the checkpoint | Yes |
| Hidden food pickup | Full health | Break the right wall near the boss | Yes |
| Crypt Key chest | Full health and full mana | Equip the relic, open any chest | Unconfirmed |
Nothing in the published material describes passive health regeneration, a purchasable potion, or a second healing button. If it is not in the table above, treat it as unannounced rather than undiscovered.
The L1 heal: health bought with mana
On PS5, healing is the L1 button, and every press spends mana. That is the whole transaction, and it shapes every fight: healing is always available, but it is never free. PlayStation's July 2026 hands-on is the only first-party description of the input, and it pairs L1 with the other half of the economy — mana returns by defeating enemies, not from pickups. Clearing the room is the refill.
Official source: Castlevania: Belmont's Curse hands-on report — L1 spends mana on healing, Triangle spends mana on spells, and mana returns by defeating enemies.
The catch is that Triangle pulls from the same pool. Every heal makes your next spell more expensive in practice, and every spell leaves less healing in reserve. Going into The Fallen with full mana and spending it all on early heals can leave you unable to cast the spell that would have ended the fight a phase sooner. The full button map and the trade-offs are on the controls and difficulty page.
One upgrade softens the tension. A listed upgrade path for the Holy Cross Arcana refunds part of the mana cost per enemy hit when you catch the cross on its return, which turns accurate throws into healing budget. The Arcana upgrade chain is covered in the Arcana system guide.
Because healing and spells share one mana pool, topping yourself off at 80 percent health can cost you the killing cast later. Heal when a hit would otherwise end you, not when the bar looks untidy.
The published button map covers PS5 only. On Xbox, Switch, and PC, follow the on-screen prompt for the heal input — no full key map has been published for any of those platforms.
Flasks: the charges you spend on the boss
Flasks are the second healing layer: limited charges you drink mid-fight, separate from the mana pool. The demo never names a fixed carrying capacity, because the capacity is a slider. Under Settings, Gameplay, Custom Mode, a Maximum potions control adjusts how many charges you carry, alongside sliders for damage dealt, damage received, and EXP gained.
The intended loop is visible in the walkthrough: save at the Mirror of Life before The Fallen's door, then spend your flasks freely on the fight itself, because the Mirror refills them. Hoarding flasks through the sewers and dying with a full set is the classic beginner mistake. The ordered route, including where that last Mirror sits, is in the demo walkthrough, and the fight they are meant for is broken down in how to beat The Fallen.
Mirror of Life checkpoints: the full reset
Mirrors of Life are the demo's checkpoints, and touching one does four things at once: it saves your progress, heals you completely, refills your flasks, and sets your respawn point. There is no reason to walk past one. The price is that roaming enemies in the area respawn, so a Mirror never banks a cleared room — it banks you.
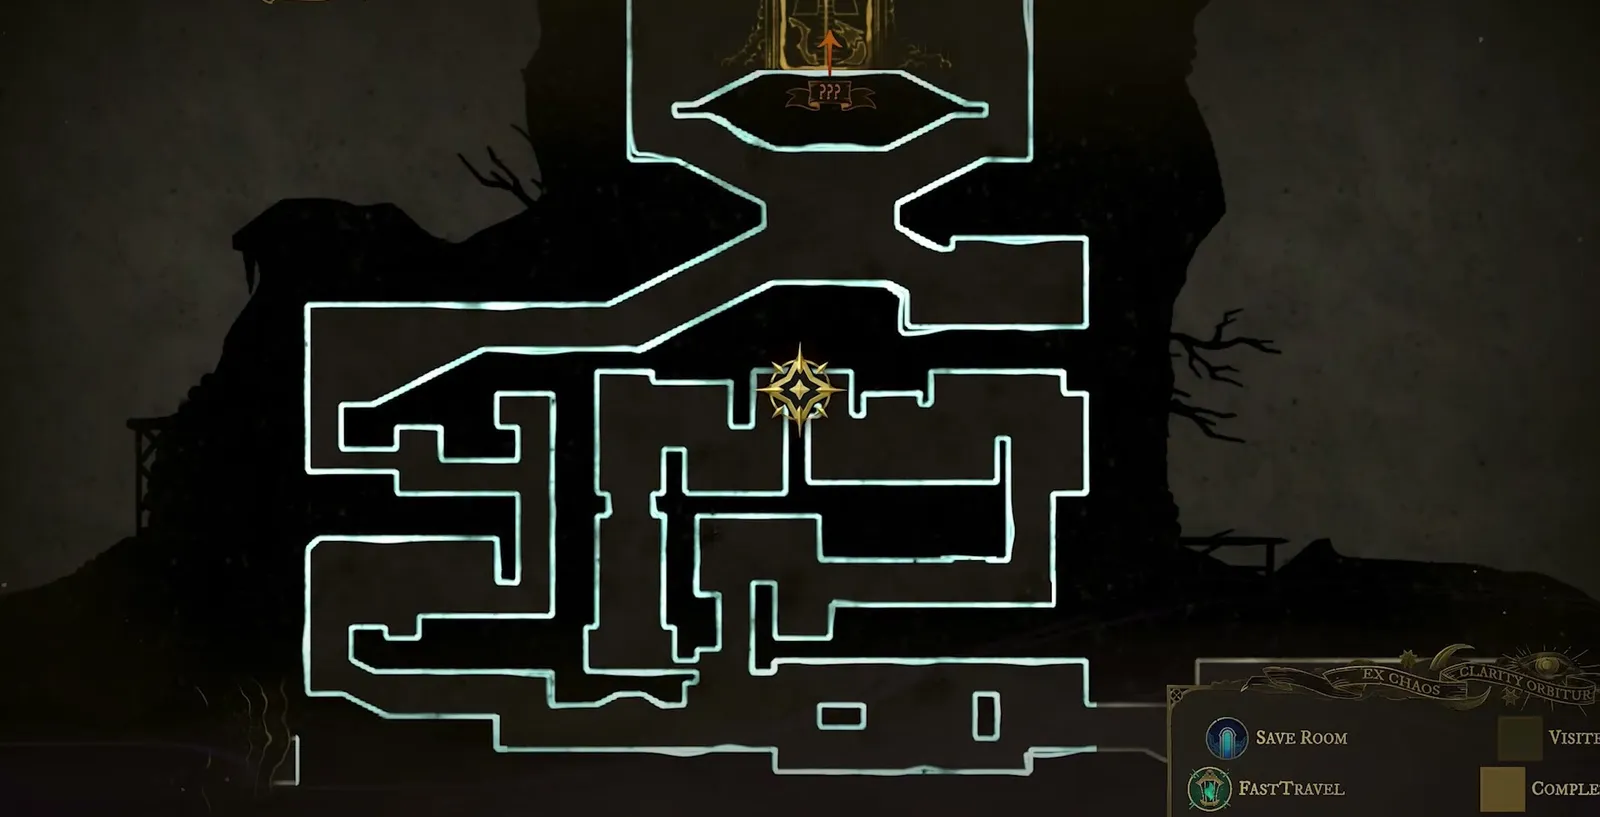
The map marks every Save Room in the demo. Touch each Mirror of Life before pushing into a new area, not after.
The respawn trade cuts both ways: enemies come back, but so does your full bar and your full flask set. Make the Mirror the last thing you touch before a new corridor and the first thing you touch coming back.
Konami has published no checkpoint count and no map, so treat any specific number of Mirrors as unverified. What the demo confirms is what a Mirror does, and it does it every time.
Food in the walls and the Crypt Key chest
Two more heals hide in the environment. Playthrough footage shows a food pickup inside a breakable wall on the boss approach that fills health to maximum — one more reason to smash every suspicious wall on the way to The Fallen rather than sprinting past. It is a single pickup, not a farm: once eaten, it is gone.
The bigger one is the Crypt Key, the one Relic with a published effect. PlayStation's reporter found it in pre-release hands-on time: fully restored health and mana whenever Rose opened a chest, turning exploration routing into resource management. The Relic rules, including the three-slot cap, are on the weapons and relics page.
Official source: Castlevania: Belmont's Curse hands-on report — the Crypt Key fully restored health and mana on every chest opened. Konami's demo page confirms the demo covers the opening chapter but never lists its items, so treat the Crypt Key as a confirmed full-game Relic of unconfirmed demo availability.
Do not plan a demo run around the Crypt Key. The demo covers the Paris streets, the sewers, and one boss, and nobody has published its item list. If you open every chest and never see it, nothing is bugged — it may simply not be in this build. The demo guide lists what is confirmed playable today.
Surviving the sewers without running dry
The sewers are the demo's main body: drain shafts, tight corridors, zombie groups, and most of the breakable secret walls. Healing here is about spending less as much as restoring more. The Longsword's published perk — extra damage when you attack immediately after a backdash — ends fights faster, and shorter fights cost fewer flasks. Dodging through attacks on the Circle button's invincibility frames beats healing through them.
If the sewers still drain you, the Custom Mode sliders are the honest answer. Konami's producer confirmed in a Famitsu interview that the options menu holds difficulty adjustments, and players report the following levers:
| If this is your problem | Change this | Why it helps healing |
|---|---|---|
| You die before reaching a Mirror | Damage received down | Each mistake costs less of the bar |
| Flasks run out mid-corridor | Maximum potions up | More drinks between Mirrors |
| Boss attempts cost a long walk | Restart-before-boss toggle on | Respawn at the door, not the last Mirror |
| You want to learn the sewers first | Prevent-death toggle on | Removes the fail state while you map the route |
Nobody has published the slider ranges or step sizes, so change one at a time and fight for five minutes before touching another. Player discussion of the exact menu labels lives in the Steam demo thread, and the Relic half of build planning — including the three-slot cap from Konami's product page — sits with the loadout system, not the difficulty menu.
FAQ
How do you heal in Belmont's Curse? Press L1 on PS5 to spend mana on healing, drink flasks for charges that cost no mana, or touch a Mirror of Life for a full restore. Mana refills only by defeating enemies; flasks refill at Mirrors.
Does touching a Mirror of Life heal you? Yes, completely, plus a flask refill, a save, and a new respawn point. Nearby roaming enemies respawn as the trade-off.
How do I get more healing flasks? Raise the Maximum potions slider under Settings, Gameplay, Custom Mode, and refill the charges at any Mirror of Life. There is no published fixed capacity.
Is there any free healing that costs no mana and no flasks? Yes, two kinds: Mirrors heal for free on touch, and a food pickup in a breakable wall near The Fallen fills health to maximum. The Crypt Key relic would add chest heals, but it is unconfirmed in the demo.
Can chests heal me in the demo? Only with the Crypt Key equipped, and that Relic comes from a pre-release preview build — Konami has not listed the demo's items. Open chests anyway, but do not count on a heal.
Do I keep my healing upgrades when the demo transfers to the full game? Konami says demo saves transfer under five conditions — same platform, same account, kept save, updated full game — but never specifies whether levels, weapons, or Relics carry over. Assume nothing about your build survives until the full game launches.
Related Guides
- Castlevania Belmont's Curse Demo Walkthrough — the ordered route with every Mirror of Life and the food wall on the boss approach.
- Belmont's Curse Controls and Difficulty — the full PS5 button map behind the L1 heal and every Custom Mode slider.
- Belmont's Curse Weapons and Relics Guide — the Crypt Key effect, the three Relic slots, and the preview-build caveat.
- How to Beat The Fallen in the Belmont's Curse Demo — the fight your flasks are meant for.
- Castlevania Belmont's Curse Demo Guide: How to Play — download links, demo scope, and what carries into the full game.
- Belmont's Curse Arcana System Explained — the Holy Cross mana-refund upgrade that funds your healing.
More Castlevania: Belmont's Curse Guides
PlayStation button map for dodge, Arcana Whip, spells and healing, plus slider-based custom difficulty for damage dealt, taken and EXP rate.
Many PC players boot to a black screen. Six community-confirmed fixes, ranked: cap refresh to 120Hz, enable VSync, delete PLAYERPREFS.sav.
Reported 45fps dips, the odd 'Limited FPS' setting, a demo resolution cap and Linux 240Hz issues, in a settings-first fix order.
The full demo route: Paris Streets, the sewers, every Mirror of Life, the three-key door and the The Fallen gate, in verified order.
The questions the demo release produced: release date, platforms, save transfer, Switch 2, editions, roguelike or not, bosses, cast and Steam Deck.
The 40th-anniversary 2D entry set 23 years after Castlevania III. Whether it works as a first Castlevania, plus where it sits in the series order.
Where the series hardest entries sit, what the demo says about this game's challenge, and how sliders tame it.
Whether a replay mode is confirmed, what typically carries over, and how Arcana and relics set up a second run.